|
Looking for ways to use gallery strip in your handmade jewellery projects? Decorative gallery strip, otherwise known as gallery wire, is perfect for a variety of applications and can be easily transformed into a number of jewellery pieces. From using it to add a simple detail to a design to creating an eye-catching ring, there are plenty of ways you can incorporate gallery strip into your work. To give you some inspiration, here are just a couple of ways to use gallery strip and beaded wire which you can consider when planning your next jewellery design. Want to learn more about gallery strip first? Discover what it is and how versatile it can be in this blog article. How to Make Silver Stacking Rings Using Gallery StripFollow this tutorial by Lydia Niziblian to discover how easy it is to make beautiful stacking rings using berry gallery strip or beaded wire.
Level of design: Beginner What you’ll need:
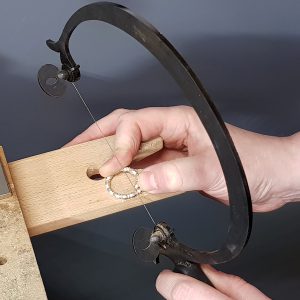
Before you startTrim the leading edge of your chosen strip or wire to the start of the design. Step 1Cut the strip or wire to the length you want (you can bend it around the triblet to the correct ring size first then mark it off). Saw the strip or wire at a clean junction, making sure you saw at a point that when the ring is soldered it will form a continuous design. TIP: If necessary, err on the side of it being a little shorter than you want, as the finished ring should easily be stretched using a hide mallet and triblet.
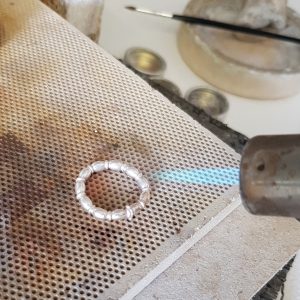
Step 2Use a needle file to file flat the edges that are to be soldered. Step 3Use ring bending pliers to bend the strip or wire into a ring shape, pushing the edges together neatly. Hold the ring up to the light to check that the joint is snug. Step 4Syringe a tiny amount of solder paste onto the join, and solder the join closed. Quench and pickle the ring.
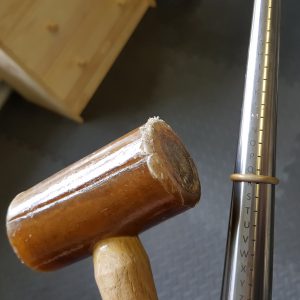
Step 5Tap the ring into shape using your rawhide mallet and triblet. Step 6Check the ring to see if the solder join needs any cleaning up – if so, you can do this with needle files or emery paper. Finally, polish the ring using your preferred method.
How to Make a Cabochon Ring with a Gallery Strip SettingFind out how to create a ring featuring an inverted heart gallery strip cabochon gemstone setting in this step by step tutorial by Lydia Niziblian.
Level of design: Intermediate What you’ll need:
Step 1Cut the chosen metal for your ring band to the desired size, then use your ring bending pliers to bend the metal for the ring band so the edges are touching. Step 2Use a flat needle file to make sure the two edges of the metal are clean and fit together snugly. Hold the ring up to the light when the edges are pushed together to ensure you have a good join. Step 3Place a small pallion of hard solder onto the join of your fluxed ring, and solder then quench. Step 4Place the ring on the triblet and tap with a rawhide mallet to shape.
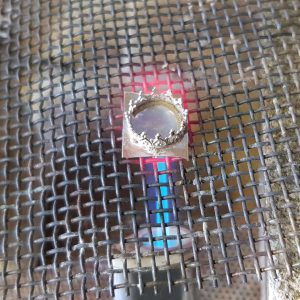
Step 5Use a needle file to tidy up the ring. If using a D shape band, file a flat plane on the edge as this will make it easier when soldering onto the gallery strip setting later. Step 6Wrap your chosen gallery strip tightly around your gemstone. Cut at the overlap using side cutters, or mark and saw where required. Use ring or half round pliers to line up the edges neatly, ready to solder. TIP: Ensure your overlap is neat, so the pattern of the wire will run smoothly. Step 7Flux the join and place the gallery strip on a tiny pallion of hard solder. Solder, heating gently to avoid overheating the wire edges. Quench, then check the gemstone fits comfortably into the setting with no gaps. Remove the stone. Step 8Flip the setting over, and syringe easy solder paste around the base, then pace the setting onto a piece of 0.5mm sheet just larger than the setting. Ideally you want to heat the piece from beneath to avoid melting the gallery strip, so use steel mesh to raise the setting and heat from below then quench. TIP: Alternatively, you can turn the setting upside down and heat the base of the setting to solder.
Step 9Carefully saw around the base of the setting and use a needle file followed by fine wet and dry paper to file the setting smooth. You should now have a smooth bezel cup ready to solder to your ring band. Step 10Place the setting upside down on your soldering block, squeeze a small amount of easy solder paste into the centre, and hold your ring band in place with tweezers. The flat edge you filed earlier should be flush to the back of the setting. Solder the pieces together, then quench and pickle. Step 11Polish the settings using your preferred method (using a barrelling machine is ideal for this). Gently push your gemstone into the clean, dry and polished setting. Step 12Use a burnisher to gently push the setting over the stone. Start at the cardinal points, and gradually work your way around, ensuring the setting is flush to the top of the stone. If needed, give your piece a final polish.
Feeling inspired? Get started with using gallery strip and beaded wire today by taking a look at our varied selection – with so many decorative designs available, there are plenty of ways you can add it to your jewellery making projects. source https://diamonds-jewelry.net/top-posts/how-to-use-gallery-strip-cooksongold/ Via https://diamondsjewelrynet.tumblr.com/post/184032154432
0 Comments
Leave a Reply. |


 RSS Feed
