|
Getting married soon? Well, you better start exercising those neck muscles, then. Be it our great Indian wedding, our menu, our decorations or our bridal jewellery, we always go BIG. No change there this year either, ladies, except that it all just got bigger—especially the jewellery! Thanks to Bollywood brides Sonam Kapoor (who pretty much covered herself in jewellery) Deepika Padukone (who was also decked to the 19s in jewellery), Priyanka Chopra (maybe not as much, but still), and the like, bridal jewellery just went bigger, bolder and really out there. So, while big is the size you should keep in mind, feel free to play around with the various styles. Temple jewellery is trending a lot this year (again thanks to the Bollywood brides) and so is the long and heavy Rani mala. Both these styles highlight gold and is also more along traditional lines. However, go for precious stone-studded styles in temple jewellery to give it a more mod look. You can also opt for an antique finish or pure gold finish. Rani malas come with a mind-boggling variety of precious stones, pearls, gold beads, kundan work, filigree work and the like. You can even pair a really long rani mala with a slightly smaller one for a true regal look. They’ve been bold statement pieces for ages now, but this year they’re trending as bridal jewellery. We’re talking about the choker. A thin long neck clasped by a choker has always been an eye-catcher. As a bride, you should opt for thick chokers with precious or semi-precious stone beads hanging at the neckline. Though slender necks have always been mandatory with chokers, the thick bridal style chokers can easily cover up a not-so-thin neck and leave many hearts burning. Another trend of 2019 is floral jewellery—where flowers and buds made of fine colourful cloth are embedded into the jewellery. If you find it a bit too off-beat, you can totally rule the look with floral-patterned gold and diamond jewellery. Whether you go for a chunky look or for delicate pieces, not only will you be carrying off the latest trend, but you will be doing it with class. source https://diamonds-jewelry.net/top-posts/bridal-bling-blog-jos-alukkas-jewellery/ Via https://diamondsjewelrynet.tumblr.com/post/184596527687
0 Comments
Busch are a German company based in Engelskirchen, originally founded in 1905 by two brothers Erich Busch and Ernst R Busch. Busch jewellery toolsBusch’s original aim was to provide better quality, precision tools to the dental industry which was still in its infancy at the time.
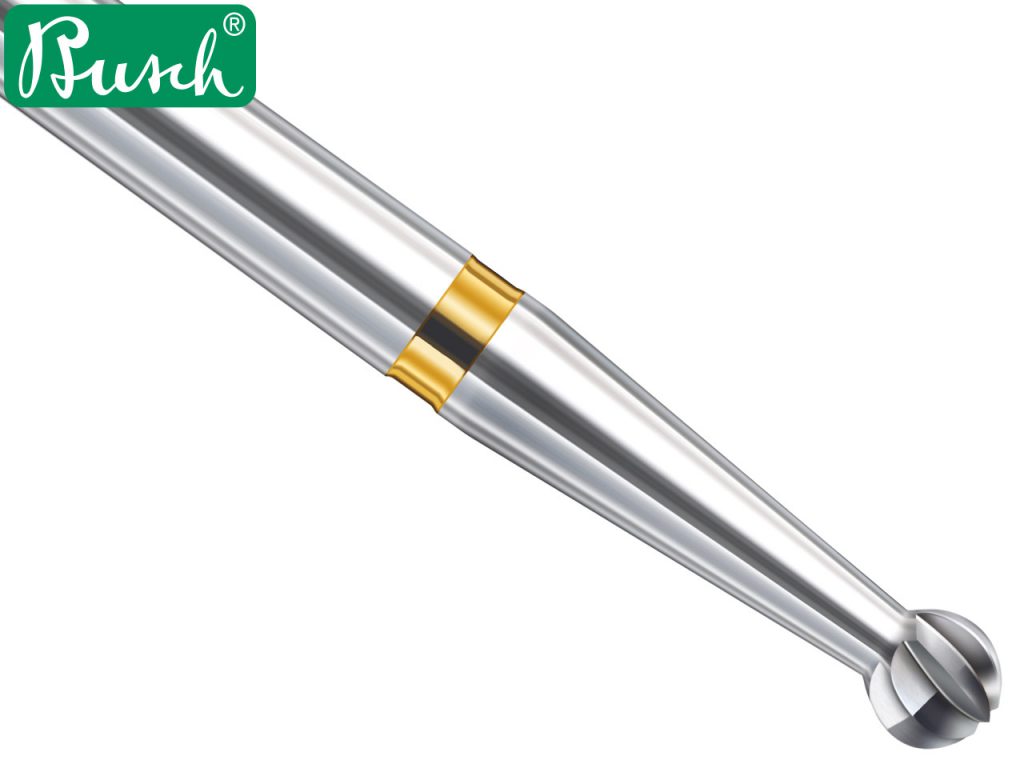
However, as production increased and their success grew, they found that their new innovations in cutting and abrasive rotary equipment were also very well suited to jewellery making – and so now Busch produce a variety of burrs and drill bits among a selection of other jeweller’s tools for stone setting. Product innovation at BuschStill managed by third-generation family member Gert Busch, Busch continues to break new ground when it comes to burr innovation. When the company first started, they produced some of the first dental carbide drills available in Germany, as well as ceramic bonded abrasives and diamond coated grinding instruments. Today the company continue to develop their diamond coated instruments using state of the art technology, always with the users’ improved experience at the centre of their ideology. Busch carbide burrsMaterial developments are key to the strength and efficiency of a burr, and manufacturers are constantly striving to improve these two factors to produce better products. Carbide is three times stronger than any steel, and it also has great heat and wear resistance so it’s easy to see why Busch products were so successful when they first appeared on the market. Its strength also means it is suitable to use with any metal both soft and hard, which makes it quite a unique material with a huge range of uses.
The carbide burr pictured above is one of Busch’s newer products and is made from isostatically compressed, finest grade carbide steel. These burrs are durable and powerful, and are designed for working on hard jewellery metals such as white gold, platinum and titanium with great efficiency. This shape of spherical burr in particular is good for shaping, texturing and creating indents for setting stones, and is recognisable as ‘high tech’ and ‘ultra durable’ by its gold band visible around the shaft. Busch twin cut concave burrsAnother great innovation from Busch is their brilliant twin cut concave burr, which combines three processes (rounding, smoothing and shortening) into one swift and efficient manoeuvre. Perfect for chaton work, if you have never used one of these before it is like magic happening before your very eyes!
Manufactured from tungsten vanadium steel, these burrs offer precision and strength along with great resilience to wear which means you can expect them to last. As well as twin cutting geometric blades, these burrs have two chip channels which allow waste material to be quickly removed during the operation itself, reducing clogging and improving efficiency when creating your pieces at the bench. High quality tools for jewellersWhilst it is impossible to summarise every one of Busch’s high quality products in just one article, we will say this; the reputation of Busch jewellery tools is built on many years of research and innovation undertaken by one family dedicated to the production of quality items. Those items deliver dependable excellence time after time, making Busch a brand you can rely on in your jewellery making workshop. Now you know more about Busch, why not discover which of their burrs is best suited to your project by taking a look at our guide to choosing the right burr for your design? Don’t forget about parts two and three of this series too, which cover the shapes of Busch burrs and the jobs they are intended for. source https://diamonds-jewelry.net/top-posts/brand-focus-busch-burrs-for-jewellery-making/ Via https://diamondsjewelrynet.tumblr.com/post/184574612297 The birthstone for May is the beautifully vibrant emerald. Emeralds have historically been associated with fame and wealth, having been worn and cherished by many monarchs, rulers and celebrities from Cleopatra to Elizabeth Taylor. Loved for its vivid green hues, an emerald can vary from shades of pale pistachio to deeper greens, and, very rarely, tones of teal and turquoise. A fascination with the stone spans centuries. In ancient Greece and Rome, emeralds were said to be the gemstone of Venus, goddess of love and hope. Meanwhile, on the opposite side of the world, emeralds were cherished by the Incas and thought to be a source of eternal life by the Egyptians.
Today, the iconic green of May’s birthstone holds different meanings. Emeralds with a softer, more soothing tone are said to represent loyalty and peace, whilst those with deeper greens are said to represent happy beginnings or new life in nature – making it the perfect spring stone. With proper care, emeralds can retain their beauty for generations. Easy to maintain with long-lasting beauty, emerald jewellery makes the perfect gift to any May-born Taureans or Geminis, or anyone close to you as they symbolise truth, love and hope. Putting a contemporary twist on emerald jewellery, our bestselling Mini Halo Hoop earrings are lined with bursts of emerald gems for easy-to-wear, colourful opulence.
Stories of the Stone During Cleopatra’s reign, the queen was allegedly adorned in emeralds day and night. When visiting dignitaries left Egypt, she would present them with her likeness carved into large emeralds. A once lost mine of Cleopatra’s emeralds, gifted to her by the Greeks, has been discovered in the years since she ruled. Elizabeth Taylor, who incidentally and famously played Cleopatra, shared a passion for the gem, with her iconic emerald pendant selling in 2011 for $6.5 million.
The emerald takes its name from the ancient Greek ‘smaragdus’ which literally translates as ‘green’, a word which was in turn derived from from the Semitic ‘baraq’, meaning ‘shine’. Discover your birthstone and its meaning with our Birthstone Guide. Or explore more gemstones with our Gemstone Guide. // (function(d, s, id){ var js, fjs = d.getElementsByTagName(s)[0]; if (d.getElementById(id)) {return;} js = d.createElement(s); js.id = id; js.src = “http://connect.facebook.net/en_US/sdk.js”; fjs.parentNode.insertBefore(js, fjs); }(document, ‘script’, 'facebook-jssdk’)); source https://diamonds-jewelry.net/top-posts/may-birthstone-emerald-jewellery-astley-clarke/ Via https://diamondsjewelrynet.tumblr.com/post/184564417372
Every person has unique features that set them apart from others. But did you know that choosing Round Face Oval Face Square Face Heart-shaped Face Pear-shaped Face The pear-shaped face is the opposite of the heart-shaped face. This means that you have a narrow source https://diamonds-jewelry.net/top-posts/face-the-glam-blog/ Via https://diamondsjewelrynet.tumblr.com/post/184527253752
Follow our step by step guide below on making byzantine chain. Once you’ve got the basics, you can then use this technique to create not only chains, but unique earrings and rings too. What you’ll need:
How to make byzantine chain in 6 stepsStep 1: Start with two jump rings Take your first jump ring. Place it in the jaws of your chain nose pliers with a gentle but firm grip. Now with your other set of chain nose pliers, twist the jump ring until the join is completely flush and no longer noticeable. Using two sets of chain nose pliers make this easier, as you can accurately shift the jump ring so that you have a completely flush join. Now repeat this process with the other jump ring. Step 2: Add your two closed jump rings to another Once you’re happy that your first two jump rings are tidily closed, take another and open the join with a sideways motion using your pliers. Add your two closed jump rings to your open jump ring and close it securely. You should be left with two closed jump rings looped through one closed jump ring. Step 3: Add a new jump ring to your two jump rings Take a new jump ring and open it with your pliers. Loop it through the two jump rings that are already connected to the one jump ring. Now close it with your chain nose pliers. Step 4: Add two more jump rings to the two you’ve just added Repeating that technique, take another two jump rings and open them with that twisting motion using your pliers. Loop them through the two jump rings one by one, and close off. You should now be left with three double loops. Top tip: At this stage you may want to use a pipe cleaner or something similar to thread through the first two jump rings. Tie this off so that you keep your byzantine weave organised as you work. With so many jump rings, it’s easy to get confused! Step 5: Now for the fiddly part! Now you have your three double rings in place, take the two end jump rings (the ones that are not attached to your pipe cleaner). Flip them back on themselves, taking one jump ring left and one right. Open another jump ring, slide it between the two end loops and catch the two loops that you‘ve just pushed back. Then you can close the jump ring you’ve just added. Don’t forget to add your second jump ring in the same position – remember that you always work in pairs with this project. Step 6: Rinse and repeat Once you’ve perfected the above steps, you can repeat this process again and again to create the correct length of byzantine chain for whatever design you’re creating. Making byzantine chain with jump rings galore!Learning how to make byzantine chain is a great way of expanding on your designs with minimal effort and without spending much on supplies. Once you’ve perfected the byzantine chain pattern, you could experiment by attaching shorter lengths of byzantine to earrings designs, or by separating each byzantine chainmail link with beads. Just remember that you’ll need to stock up on jump rings to create multiple pieces! source https://diamonds-jewelry.net/top-posts/how-to-make-byzantine-chain/ Via https://diamondsjewelrynet.tumblr.com/post/184527253632
But there are ways to tell the difference between these two precious stones. If you’re debating using moissanite as part of your next jewellery making project, or you’re simply curious about the stone and its synergy with the diamond, read on to find out more! Firstly, is moissanite a diamond?No, moissanite is not a diamond. In our article “What Is Moissanite?” we delve further into the origins of moissanite, its chemical formula and refractive index. But for now, moissanite is an entirely different stone to the diamond. While moissanite may look almost identical to the diamond, it is not the same entity. You may be wondering “is moissanite a natural gemstone?”, to which the answer is technically yes. However, given moissanite’s rarity, it is mostly synthetically produced. Moissanite vs. Diamond: ValueIs moissanite valuable? The price you pay for moissanite stones can differ greatly. Moissanite gemstones are a fraction of the price of diamonds. The cost of a moissanite stone will only really vary with sizing. Typically, a moissanite stone will sell for 10 or 15% of the price of a diamond, with similar clarity and cut. Moissanite vs. Diamond: HardnessBoth consumers and jewellery makers favour harder stones due to their ability to withstand knocks and accidents without getting scratched easily. That’s partly why diamonds are so desirable, with a score of 10 on the Mohs scale. But moissanite doesn’t differ all that much. At 9.5 on the Mohs scale, moissanite scores higher than any other gemstone besides than the diamond.
Moissanite vs. Diamond: Clarity and ColourDoes moissanite look like a diamond? Diamonds can be graded on colour, but moissanite cannot. Instead, moissanite is graded by its closeness to being colourless.
As for inclusions, moissanite can commonly have needle-sized inclusions that are invisible to the naked eye. Most gemstones feature inclusions as they are part of the crystalline structure and are unique to every stone. You can see them under magnification, but they don’t compromise the clarity. Due to moissanite’s natural occurrence being so rare, it is typically manufactured in labs. This means lab conditions can control how the stones look and can remove any internal flaws that could compromise clarity. Moissanite vs. Diamond: BrillianceHeralded for its ability to reflect white light better than a diamond, moissanite has a BRI (brilliance refractive index) score of approximately 2.65 – 2.69. The diamond has a BRI score of 2.42. Moissanite’s brilliance is simply what makes it sparkle. And because it’s less likely to get greasy and dirty, it will stay sparkly for longer in between cleanings. If you want to compare moissanite’s brilliance to gemstones other than the diamond, we’ve included some examples below:
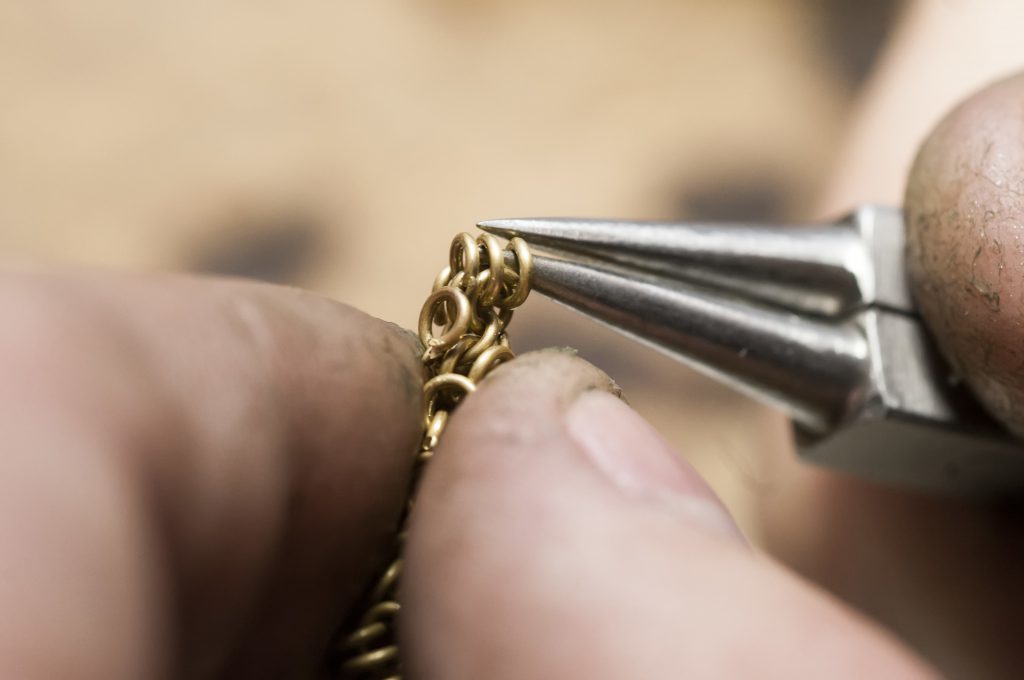
So, is moissanite a good diamond alternative?Now you’re aware of the differences between moissanite and diamonds, you’ll be able to make your own judgement on whether moissanite would make a good diamond alternative. Moissanite has features that outshine the diamond, but diamonds are marketed to evoke tradition, beauty and magical quality. If you’d like to learn more about moissanite and its properties, check out our article “What Is Moissanite?”. Or if you’re searching for moissanite to use in your next jewellery making project, browse our selection of moissanite gemstones at Cooksongold today. source https://diamonds-jewelry.net/top-posts/moissanite-vs-diamond-whats-the-difference/ Via https://diamondsjewelrynet.tumblr.com/post/184457728082 Repairing jewellery for your customers is often a large part of business that comes through your doors unexpectedly, and can be a good way of making some extra money alongside your jewellery designs. So it pays to know the ins and outs of jewellery chain repair. From basic repairs to soldering chain links, we’ve put together this jewellery chain repair guide so that you can make neat, professional chain repairs for your customers.
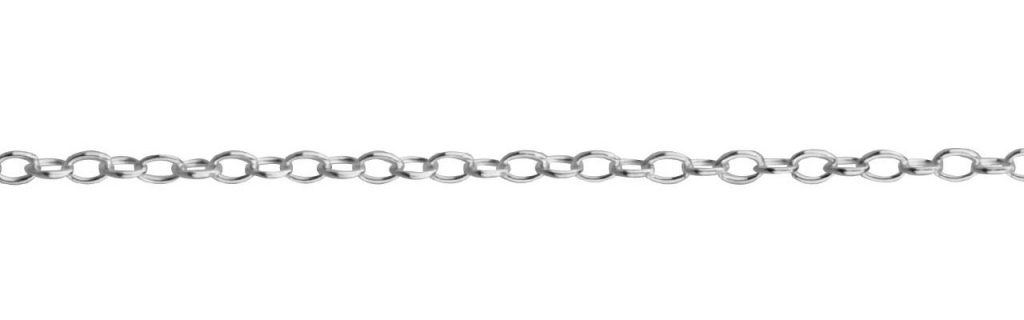
How to fix a broken necklace chainThere are many different types of chain out there, and some are much easier to fix than others. Learning the basic principles of a necklace chain repair will help you progress to some more complex jewellery chain repair techniques such as soldering fine jewellery chain links together. Not sure how to tell the difference between the various styles of chain? Take a look at our Beginner’s Guide to Different Types of Chain to learn more. So, let’s start with the basic principles of how to repair chain. This can only be done with chains such as cable chain or curb chain where the chain itself is made up of interlocking links. Other more complex patterns such as rope chain or ball chain may need more intricate work.
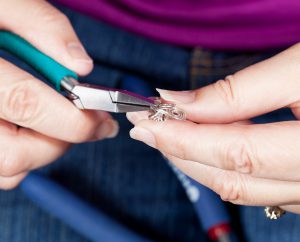
Our basic snake chain repair trickThere are some chains that seem impossible to repair! But there are some basic tricks you can use to get around this. For example, snake chain appears impossible to repair because of the way it’s constructed. So instead of repairing the tiny chain links themselves, we’d recommend repairing the end of the snake chain by adding a chain extender to it instead. That way you’ll maintain the rest of the chain and fix the problem area where it’s weakest – at the clasp. Soldering snake chain can be tricky. But it can be done! You’ll just need a steady hand, patience and a lot of practice to get this right. You’ll need to solder your chain extender to each end of the snake chain to make the repair. Once you’ve mastered this, this next bit of advice on soldering chain links will be a breeze! Soldering chain links: Tips and tricksSoldering chain links can seem very fiddly at first but once you’ve gotten to grips with these tips and tricks your customers will come back to you again and again for jewellery chain repairs.
Don’t forget to stock up on soldering tools and supplies before you practice soldering chain links together.
Now you’ve learnt the basics of jewellery chain repair you can add this to your jewellery making repertoire, and even make it a permanent service for your existing customers. For your latest chain designs make sure you stock up at Cooksongold. We stock loose chain and finished chain in a variety of alloys and styles to help you speed up your jewellery manufacturing process. source https://diamonds-jewelry.net/top-posts/jewellery-chain-repair-everything-you-need-to-know/ Via https://diamondsjewelrynet.tumblr.com/post/184410893647
That’s why we’ve put together this simple step by step guide on how to make wire wrapped earrings. Jewellery tools and supplies you’ll need: Need an intro to jewellery making wire before you get started with your DIY wire wrapped earrings? Check out our Beginner’s Guide to Jewellery Making Wire & How To Use It for advice on which size wire to use and a handy wire gauge conversion chart. How to make wire wrapped earrings step by stepStep 1: Preparing your jewellery wireFor this wire wrapped earrings tutorial, we’d recommend taking your 0.8mm wire and cutting it to a length of approximately 24mm. The length of your wire may vary depending on the size of your stones. If the beads you’re using are particularly small you may find that you have a lot of excess wire, but don’t worry. As you practise this wire wrapping technique you’ll be able to better gauge the amount of wire you need per stone. Step 2: Thread your bead and start wrapping!Thread your silver wire through the hole in your chosen bead, making sure that you leave some extra wire (approx. 50mm) poking out of the top of your bead to attach your ear hook later. Now take the length of the wire at the bottom of the bead and start wrapping. With the first wrap, make sure you wrap as tightly as possible. To keep the bead securely in place, take your first wire wrap back up in the direction of the top of the bead, where the short piece of wire is shooting out. Now wrap the wire in a downwards motion, again quite close in position to the top of the bead, wrapping tightly as you go. Now you’ve secured the stone with your first wrap you can get a little more creative. Continue the wrap the jewellery making wire in any direction you like. Follow the curve of the stone or create sharp geometric patterns – the choice is yours! Step 3: Finish your wire wrapping neatlyHappy with the pattern you’ve created with your wire wrapped earring? Once you’ve wrapped the wire back to the top of the bead where the top of the wire is sticking out, you can now begin to tidy things up. Take the end of the wire and begin tightly wrapping it around the base of the wire that is at the top of the bead. How many times you wrap the wire is completely up to you – we’d recommend wrapping it at least three times for a neat, professional finish. You may find that getting a tight wrap at this stage is a little tricky. Use your snipe nose pliers to get a good grip on the wire and to pull it tight as you wrap. Tip: Remember that as you wrap the wire there may be small gaps between each wrap. You can tidy this up by taking your snipe nose pliers and gently squeezing the loops together. This will bring the loops together and leave you with a much more professional look to your handmade wire wrapped earrings. Step 4: Cut and neaten your jewellery wireOnce you’re happy with the position and look of the three loops that are wrapped around the base of the top piece of wire, you can snip the excess wire off with your wire cutters. If there are small burrs you may want to run a needle file along the edge of the cut to remove any sharp edges. You can then tuck the end of the wire away underneath one of the existing loops so that it’s secure. Go back and neaten the loops with your snipe nose pliers if needed. Step 5: Create a small loop at the base of the wireJust above those three loops you’ve created, you can now make a small loop. This will hold your earring hook so it’s important that this is secure and has no gaps for your jump ring or earring hook to come loose. Using the end of your round nose pliers, wrap the wire in a complete loop and push the excess to the side. Making sure you have a complete loop, take your wire cutters and cut the excess wire. As mentioned above, if you have any sharp burrs or edges where you’ve cut the wire, run a needle file over the surface of the end of the wire to remove and sharp edges. Step 6: Add your earrings findingsNow you’ve made the main part of your wire wrapped earrings, you can finish the design with a jump ring and an earring hook of your choice. All you need to do is open your jump ring using your snipe nose pliers. Tip: Always remember to open jump rings using a side to side motion instead of stretching the loop out. It you don’t use this twisting motion to open your jump rings it’s very difficult to make sure they retain their uniform circle shape. For more information on using jump rings, read our beginners’ guide on how to use jump rings. Once you’ve closed your jump ring you can now add your chosen earring hook. Thread it through the jump ring and, using your snipe nose pliers, squeeze the earring hook wire closed so that there is no chance of it coming loose from the jump ring. Now you know how to make simple wire wrapped earrings, the possibilities to come up with new variations on the basic design are endless. You can modify the stone, the shape and size of the stone, the wire wrapping pattern, as well as the kind of earring finding you use. Whether you wrap your beads in a complete spiral or you prefer a more natural look, make sure you invest in high quality jewellery making wire at Cooksongold. source https://diamonds-jewelry.net/top-posts/how-to-make-wire-wrapped-earrings-2-2/ Via https://diamondsjewelrynet.tumblr.com/post/184400686557
That’s why we’ve put together this simple step by step guide on how to make wire wrapped earrings. Jewellery tools and supplies you’ll need:
Need an intro to jewellery making wire before you get started with your DIY wire wrapped earrings? Check out our Beginner’s Guide to Jewellery Making Wire & How To Use It for advice on which size wire to use and a handy wire gauge conversion chart. How to make wire wrapped earrings step by stepStep 1: Preparing your jewellery wireFor this wire wrapped earrings tutorial, we’d recommend taking your 0.8mm wire and cutting it to a length of approximately 24mm. The length of your wire may vary depending on the size of your stones. If the beads you’re using are particularly small you may find that you have a lot of excess wire, but don’t worry. As you practise this wire wrapping technique you’ll be able to better gauge the amount of wire you need per stone. Step 2: Thread your bead and start wrapping!Thread your silver wire through the hole in your chosen bead, making sure that you leave some extra wire (approx. 50mm) poking out of the top of your bead to attach your ear hook later. Now take the length of the wire at the bottom of the bead and start wrapping. With the first wrap, make sure you wrap as tightly as possible. To keep the bead securely in place, take your first wire wrap back up in the direction of the top of the bead, where the short piece of wire is shooting out. Now wrap the wire in a downwards motion, again quite close in position to the top of the bead, wrapping tightly as you go. Now you’ve secured the stone with your first wrap you can get a little more creative. Continue the wrap the jewellery making wire in any direction you like. Follow the curve of the stone or create sharp geometric patterns – the choice is yours! Step 3: Finish your wire wrapping neatlyHappy with the pattern you’ve created with your wire wrapped earring? Once you’ve wrapped the wire back to the top of the bead where the top of the wire is sticking out, you can now begin to tidy things up. Take the end of the wire and begin tightly wrapping it around the base of the wire that is at the top of the bead. How many times you wrap the wire is completely up to you – we’d recommend wrapping it at least three times for a neat, professional finish. You may find that getting a tight wrap at this stage is a little tricky. Use your snipe nose pliers to get a good grip on the wire and to pull it tight as you wrap. Tip: Remember that as you wrap the wire there may be small gaps between each wrap. You can tidy this up by taking your snipe nose pliers and gently squeezing the loops together. This will bring the loops together and leave you with a much more professional look to your handmade wire wrapped earrings. Step 4: Cut and neaten your jewellery wireOnce you’re happy with the position and look of the three loops that are wrapped around the base of the top piece of wire, you can snip the excess wire off with your wire cutters. If there are small burrs you may want to run a needle file along the edge of the cut to remove any sharp edges. You can then tuck the end of the wire away underneath one of the existing loops so that it’s secure. Go back and neaten the loops with your snipe nose pliers if needed. Step 5: Create a small loop at the base of the wireJust above those three loops you’ve created, you can now make a small loop. This will hold your earring hook so it’s important that this is secure and has no gaps for your jump ring or earring hook to come loose. Using the end of your round nose pliers, wrap the wire in a complete loop and push the excess to the side. Making sure you have a complete loop, take your wire cutters and cut the excess wire. As mentioned above, if you have any sharp burrs or edges where you’ve cut the wire, run a needle file over the surface of the end of the wire to remove and sharp edges. Step 6: Add your earrings findingsNow you’ve made the main part of your wire wrapped earrings, you can finish the design with a jump ring and an earring hook of your choice. All you need to do is open your jump ring using your snipe nose pliers. Tip: Always remember to open jump rings using a side to side motion instead of stretching the loop out. It you don’t use this twisting motion to open your jump rings it’s very difficult to make sure they retain their uniform circle shape. For more information on using jump rings, read our beginners’ guide on how to use jump rings. Once you’ve closed your jump ring you can now add your chosen earring hook. Thread it through the jump ring and, using your snipe nose pliers, squeeze the earring hook wire closed so that there is no chance of it coming loose from the jump ring. Now you know how to make simple wire wrapped earrings, the possibilities to come up with new variations on the basic design are endless. You can modify the stone, the shape and size of the stone, the wire wrapping pattern, as well as the kind of earring finding you use. Whether you wrap your beads in a complete spiral or you prefer a more natural look, make sure you invest in high quality jewellery making wire at Cooksongold. source https://diamonds-jewelry.net/top-posts/how-to-make-wire-wrapped-earrings/ Via https://diamondsjewelrynet.tumblr.com/post/184364119092 Wire wrapping techniques in jewellery making are vast and range from making basic loops to producing intricately stone set, wire wrapped pendants. There are many designs you can create using wire wrapping techniques, so if you’re just starting out and experimenting with different wire jewellery designs, you’ve come to the right place.
Read our guide on the fundamentals of wire wrapping for beginners. And don’t forget to take advantage of our top 4 wire wrapping tips below, to help you quickly get to grips with wire wrapping techniques that will refine your jewellery making skills. Wire wrapping supplies you’ll need to practice the fundamentals:Your wire gauge conversion chart
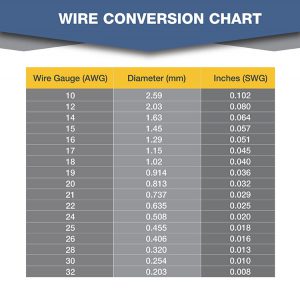
Some basic principles about jewellery wire before you get started:Jewellery wire materialsYou can buy jewellery making wire in a variety of different metals, all of which have their own properties and varying levels of hardness. Avoid using craft wire or aluminium wire. This will be too soft to hold its shape, whereas stainless steel wire will be too hard to work with. You’ll notice that most reliable jewellery supplies providers will only carry those wires in alloys that are perfect for wire wrapping such as copper, brass, sterling silver, and gold. When you’re first starting out, practise on the cheaper alloy such as copper and brass. Hardness of the metalWire hardness (sometimes referred to as wire temper) is the stiffness of the wire. Wire hardness can range from very soft to soft, to half hard and hard. For your wire jewellery designs to be formed and stay in your desired shape, work with half hard wire. Soft wire will lose its shape as you work with it and hard wire will be incredibly difficult to form into the shape you want. Half hard wire is just right. Wire size/diameter/gaugeThere are many different diameters of jewellery wire. Generally, most UK suppliers will list wire diameter in millimetres, but most jewellers in the US refer to wire diameter as the gauge. Having said that, you’ll often hear a lot of UK jewellers using the term ‘gauge’ as well. This can make converting wire diameters a little confusing! So to make the process of choosing jewellery wire fit for purpose we’ve put together a wire gauge conversion chart that will make buying wire supplies simple. Jewellery wire shape
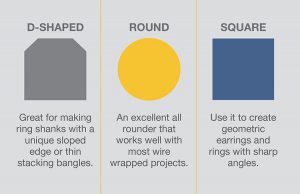
There are several pre-cut wire shapes you can choose to work with: round, D-shaped, square and twisted wire. Start out with round wire until you’re comfortable with the wire wrapping techniques you’d like to perfect. Then you can freely experiment with other jewellery wire shapes for a different take on your designs. Our top 4 wire wrapping tips and tricksTop tip 1: Make sure you file the ends of your wireWhatever wire jewellery patterns you’re working with, it’s important to make sure that you finish off the ends of your wire by filing. Often when you snip your wire with your wire cutters some sharp edges can be left behind. The last thing you want is for your customers to scratch themselves, so using a flat file, or flat needle file, smooth away any sharp edges. That way, the end of the wire will be professionally finished and completely safe to wear. Top tip 2: Keep your round nose pliers close!Your round nose pliers will be invaluable when you’re perfecting your wire jewellery designs, so make sure you keep them close. When you first start producing jump rings or other tight loops for your designs it can be difficult to keep them uniform. One way of conquering this is to mark a specific point on your pliers using a marker or perhaps with your scribers. This will ensure that when you start forming loops with your pliers there’s no need to guess. Simply use the mark in your pliers for a consistent loop every time. Top tip 3: Don’t forget to work harden your wire when finishedTo ensure your wire wrapped jewellery stands up to everyday wear and tear, you’ll need to work harden it. Work hardening is the process of forcing wire into a harder state, giving it strength and therefore allowing it to hold its shape. How do you work harden your wire wrapped jewellery design? This can be done in a number of ways. One of the most common is to hammer the wire with a rawhide mallet, although there are numerous other methods including twisting wire with a pair of pliers, pulling the wire straight multiple times and more. Work hardening can be done before and after you have completed your design. Using a rawhide mallet and a steel bench block to hammer your wired jewellery once completed can work well however be aware that this may not work for all cases. Top tip 4: Remember to close loops to keep your gemstones in placeWire wrapping gemstones? Your main concern will be making sure you close all loops in your wire so that your gemstone remains firmly in place. The great thing about wire wrapping jewellery is that you can close loops in a creative and functional way. So, practise different ways of keeping gemstones firmly in place with your wire until you reach a design that works with your jewellery making style and works functionally. Now you’re set to put all of the above wire wrapping techniques into practice, you’re ready to stock up on your chosen wire jewellery supplies. Choose from copper, brass, silver, yellow and white gold wire depending on your signature jewellery making style. source https://diamonds-jewelry.net/top-posts/4-wire-wrapping-tips-to-refine-your-designs-the-bench/ Via https://diamondsjewelrynet.tumblr.com/post/184283244907 |


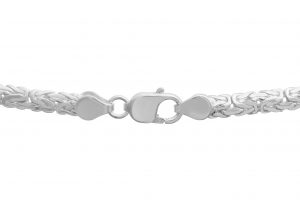 Looking for a new jewellery making technique to diversify your designs? Learning how to make byzantine chain or a byzantine weave is an excellent way of branching out into different looks that could become the basis of a new collection.
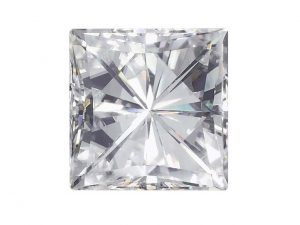 Since its 1893 inception in a meteor crater, moissanite has been regarded as a rare and scarce mineral, bolstering its desirability among consumers and jewellery makers alike. Moissanite is often used as an alternative to the diamond in jewellery making, and many people are unable to tell the two gemstones apart.
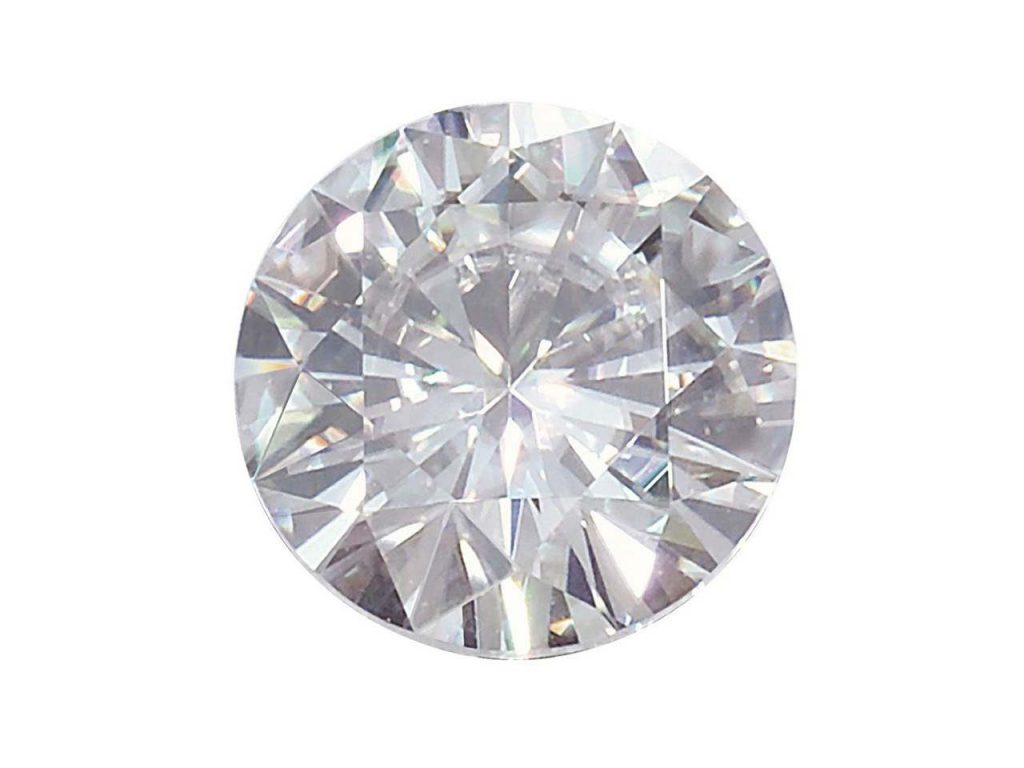

 Wire wrapping is a skill that anyone can pick up and master in jewellery making. The beauty of making wire wrapped jewellery is that there is no right or wrong way of going about it – you can create free form patterns with your wire, so making wire wrapped earrings is an excellent way for beginners to get started.
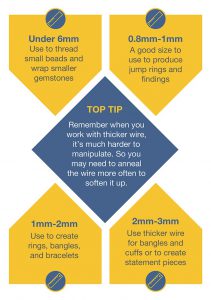
 RSS Feed
